Thursday, July 31, 2008

Liquorice Allsorts


I have a thing for crocheted food. It's so cute! I talk a lot about usefulness of items, and crocheted food has no use! I wish I could say I was crocheting them as play food for a child or something, but really I'm crocheting them for myself. I even have a cake stand to display them. It's like an imaginary tea party. Of a mad hatter.
Anyhow, these liquorice (or licorice) are really easy to make. You just crochet squares (mine were 7 sc wide and 5 rows high, but you should adjust the measurements according to your yarn and hook sizes) in black, white, and other colors of your choice. This a good project for using up leftover yarn. To assemble, place the squares in the order you want on top of each other. In the picture I have color-black-color, and color-black-white-black-color liquorice. Both the top layers should be of the same color. Sew together through all layers with the color of the top layers.
That's it! It's a very quick project.

Wednesday, July 30, 2008

Coin Magnets


Lately I've been trying to declutter my apartment, and throw away everything useless. While cleaning one day, I came across some foreign coins that I had saved from my travels. I was feeling a bit sad about throwing them away, even though they just sit in a jar and I hardly ever look at them. Then I realised - just like those pictures, these coins could be made into magnets as well!
These are made of Chinese coins and some self-adhesive magnetic sheet. On the left you can see what the back of the magnets looks like.
I think it's great the way something that I considered clutter became something pretty and useful. Now I'm reminded of my travels everyday! And have some free space in my closet.
It seems like you can make magnets out of almost anything that you have lying around....

Tuesday, July 29, 2008

How to Crochet an Amigurumi Cloud

This post may contain affiliate links*.
Here's a pattern I made for an amigurumi cloud.

If you are new to amigurumi: amigurumis are small Japanese crocheted stuffed toys. They can be anything from dolls, to food, to clouds! Amigurumi is worked in a spiral so don't join the rounds! I also have several other amigurumi patterns here on my blog, check them out too!

This cloud is easy to crochet, but a bit hard to explain. Because of this the pattern involves a bit of counting... Once you get the hang of how the increases and decreases line up, though, you can forget the counting.

Because all the inc and dec have to be in line (on the top of the cloud), they don't actually really follow rows, but I think the pattern is easier to understand this way. So if the instructions for a certain "row" stop in the middle of the real row or go on to next row, don't panic, this is meant to be! If you have any questions , don't hesitate to ask!

Since the bends are ment to be sharp, the pattern has increases were you sc 3 times into a sc instead of the more common sc inc were you only sc 2 times into a sc. I've marked these as 3sc. There might be a real term for this, but I'm too lazy to try and find it at the moment...

Also, you should stuff as you go, so that all the bends will get enough stuffing.

NOTE ON MATERIALS: 

I personally used a size 2mm crochet hook*, and sports weight cotton yarn* but feel free to pick any yarn you like and a hook that suits your yarn. The cloud will be bigger or smaller than mine accordingly. As with all amigurumi patterns, use a NON-STRETCHY yarn; stretching will cause gaps and your filling will show. This is a no-no in amigurumi. You can easily test this by pulling the yarn a bit between your fingers. In general cotton is good and wool bad. Also unless you crochet very tightly to begin with I recommend you choose a smaller hook than recommended by your yarn, that way there will be no gaping between the stitches. You will usually find a one that suits your personal style only by trial and error.

With all that out of the way, let's get onto the pattern!

PATTERN

Chain 2.
  1. Sc 6 times in the second ch from the hook.
  2. 2sc in each sc.
  3. Sc around.
  4. Sc dec once, sc in the next 10 sc.
  5. 3sc in the next, sc in the next 10 sc.
  6. 3sc in the next, sc, 3sc, sc in the next 13 sc.
  7. 3sc in the next, sc in the next 16 sc.
  8. 3sc in the next, sc, 3sc, sc in the next 19 sc.
  9. 3sc in the next, sc in the next 22.
  10. 3sc in the next, sc, 3sc, sc in the next 25 sc.
  11. Sc in the next 25 sc.
  12. Sc dec twice, sc, sc dec twice, sc in the next 20 sc.
  13. Sc dec, sc, sc dec, sc in the next 19 sc.
  14. Sc dec, sc, sc dec, sc in the next 17 sc.
  15. Sc dec, sc, sc dec, sc in the next 17 sc.
  16. 3sc in the next, sc in the next 18 sc.
  17. 3sc in the next, sc, 3sc, sc in the next 18 sc.
  18. Sc in the next 24 sc.
  19. Sc dec twice, sc, sc dec twice, sc in the next 14 sc.
  20. Sc dec twice, sc, sc dec twice, sc in the next 10 sc.
  21. Sc dec twice, sc, sc dec twice, sc in the next 11 sc.
  22. 3sc in the next, sc in the next 22 sc.
  23. Sc dec 8 times, stuff, sew shut.
Cute face optional:)

P.S. If you try this pattern, please leave a comment. I would also love to see a picture of the finished product:)

EDIT: A lot of people seem to have trouble with this pattern, so I made a step-by-step tutorial on how to crochet one, with pictures! So hop over to the post about amigurumi cloud troubleshooting. Hopefully you'll find it helpful!

Monday, July 28, 2008

Lace Earrings


I saw Emily of Black Apple mention these earrings, loved them and then forgot all about them. Well, I was wandering around at the flea market and saw this small tablecloth. It was kind of horrible and there was something which looked like blood spattered at one edge... But it cost only €1, so I bought it. I took out the lace circles ( and threw away the bloody(?) ones). I sew some together to form different shapes and sprayed them with hairspray to harden them. This might not be the standard way of doing this... But aren't they lovely? They also smell kind of nice because of the hairspray. The only problem is that since they are so light they tend to slip away from the hook part. Only thing I can think is to glue it shut. Or maybe put in some beads to make them heavier, like in the original.

Thursday, July 24, 2008

Picture Magnets


I'm not sure if these pictures are even a concept in English, because when I tried to find a translation for "kiiltokuva" the only word I could find was "a glossy picture". And when I tried googling that - nothing. Anyway, these are pictures I collected as a child.
One of my mothers favorite TV-programmes is called Strömsö. In this show they make all kinds of crafts, food etc.. I was in the library leafing through a book based on the series, and I saw that they had made magnets out of those glossy pictures. I thought how I have loads of them collecting dust at home, and how it would be so much nicer to hang your grocery list on your fridge with a pretty magnet rather than with a regular grey round one.
I chose the pictures I liked the most, placed them on a self adhesive magnetic sheet, topped it with self adhesive plastic film and cut them out. Easy.
The magnetic sheet is quite expensive (for my budget), but I really like the result. And they'll probably last forever! More importantly they are cute, and allow me to display a part of my childhood in a way that is also useful.

Wednesday, July 23, 2008

Fan Bookmark


I think you can never have too many bookmarks! At any given moment I'm in the middle of about five books, reading them depending on my mood. I only buy books I know I'll love (because I've borrowed them from the library or they are from an author I adore...) and I'm constantly re-reading them. Because I know most of them from back to front, I tend to start reading from the middle, from my favorite part, or from the page I find a forgotten bookmark on... I found this pattern for a fan bookmark at Crochetroo's blog. It was easy and quick to crochet and the result is very sweet.

Tuesday, July 22, 2008

Amineko


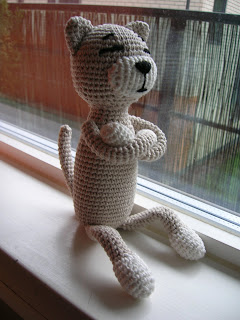
This is probably the pattern everybody starts their amigurumi hobby with. I made one too. Since it’s one of my first ones, it’s a bit wonky. But I never mind, I think he is kind of cute. He looks so calm and relaxed. I put pipe cleaners inside the paws and tail to make them poseable. I don't pose him much though (except for pictures...). The amineko is a nice, clear pattern and I learned a lot about making amigurumis and reading patterns. While I was making it, I took it with me everywhere, until a friend said it wasn't polite to crochet in company. Well then.
Anyway, here’s a link to the English pattern.
Related Posts Plugin for WordPress, Blogger...